> ## Documentation Index
> Fetch the complete documentation index at: https://qualcomm-3.mintlify.site/llms.txt
> Use this file to discover all available pages before exploring further.
# Set up the device
> After flashing Qualcomm Linux, connect the serial console, verify the software version, then choose USB (ADB), Wi-Fi, or Ethernet for ongoing host-to-device connectivity on the IQ-8275 EVK.
After [flashing Qualcomm Linux](./update-software/overview), use this page to bring the device up. Start with the debug serial console to log in and verify the software version. From there, choose **one** of the following connectivity options based on your setup:
| Option | Best for |
| ------------- | ---------------------------------------------------------- |
| **USB (ADB)** | No network available; direct USB cable from host to device |
| **Wi-Fi** | Wireless access; SSH into the device over the network |
| **Ethernet** | Wired network access; SSH into the device over the network |
If you have **not** flashed the device yet, start with [**Update software**](./update-software/overview).
## Set up the debug UART
The debug UART gives you a serial console into the device, your primary way to log in and check the device after flashing.
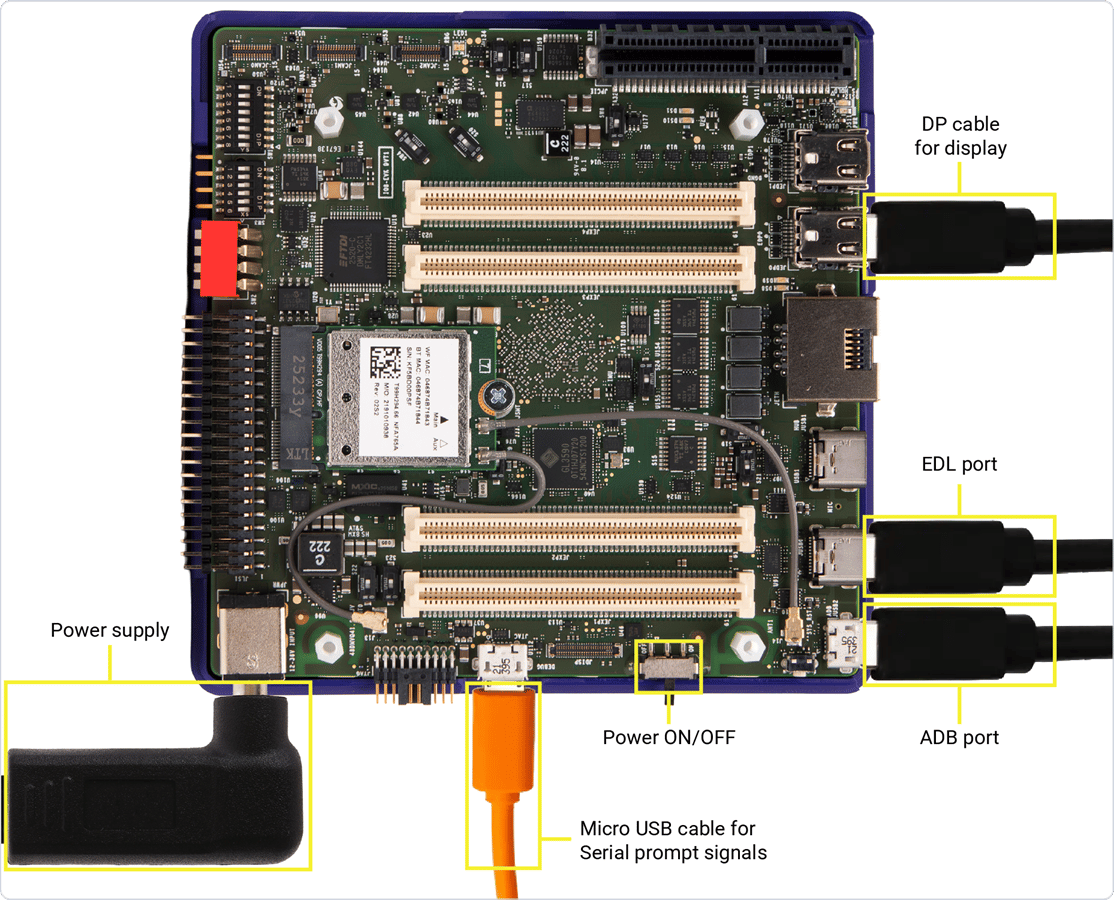
1. Connect one end of a micro-USB cable to the micro-USB port on the IQ-8275 EVK.
2. Connect the other end to your host computer.
 3. Open the serial console for your host OS:
Install `screen`:
```shell theme={null}
sudo apt update
sudo apt install screen
```
List the serial devices:
```shell theme={null}
ls /dev/ttyUSB*
```
**Sample output:**
```shell theme={null}
/dev/ttyUSB0 /dev/ttyUSB1 /dev/ttyUSB2 /dev/ttyUSB3
```
The IQ-8275 EVK's onboard adapter exposes four serial devices; the **main console is the second one** (`/dev/ttyUSB1`). Open it at 115200 baud:
```shell theme={null}
sudo screen /dev/ttyUSB1 115200
```
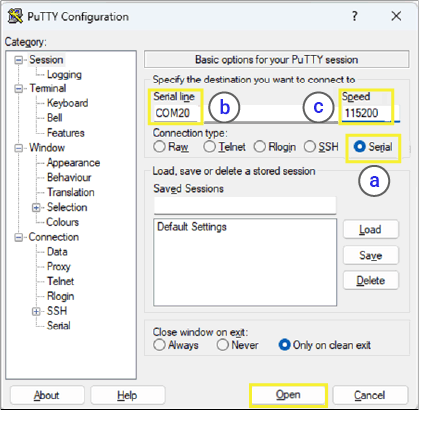
1. Download [**PuTTY**](https://putty.software/) and complete the installation.
2. Open PuTTY and select **Serial**.
3. Set the **Serial line** to the COM port detected in **Device Manager**, and the speed to **115200**.
The FTDI adapter exposes multiple COM ports. Converter B (the **second** functional port) carries the Main Domain console. Right-click each COM port → **Properties** → check the **Location** field to identify it.
If the UART port isn't detected, install the FTDI driver:
* x86 & Arm: [FTDI VCP drivers](https://ftdichip.com/drivers/vcp-drivers/)
3. Open the serial console for your host OS:
Install `screen`:
```shell theme={null}
sudo apt update
sudo apt install screen
```
List the serial devices:
```shell theme={null}
ls /dev/ttyUSB*
```
**Sample output:**
```shell theme={null}
/dev/ttyUSB0 /dev/ttyUSB1 /dev/ttyUSB2 /dev/ttyUSB3
```
The IQ-8275 EVK's onboard adapter exposes four serial devices; the **main console is the second one** (`/dev/ttyUSB1`). Open it at 115200 baud:
```shell theme={null}
sudo screen /dev/ttyUSB1 115200
```
1. Download [**PuTTY**](https://putty.software/) and complete the installation.
2. Open PuTTY and select **Serial**.
3. Set the **Serial line** to the COM port detected in **Device Manager**, and the speed to **115200**.
The FTDI adapter exposes multiple COM ports. Converter B (the **second** functional port) carries the Main Domain console. Right-click each COM port → **Properties** → check the **Location** field to identify it.
If the UART port isn't detected, install the FTDI driver:
* x86 & Arm: [FTDI VCP drivers](https://ftdichip.com/drivers/vcp-drivers/)
 List the serial devices:
```shell theme={null}
ls /dev/cu.*
```
When the micro-USB cable is connected, four serial interfaces (T0-T3) become available through the onboard FT4232H quad-UART controller. The T1 interface, exposed as **/dev/cu.usbserial-device\_unique\_serial\_number-T1**, is used as the **primary serial debug console**. The remaining interfaces (T0, T2, and T3) are reserved for other communication and debugging use cases. Find your device node(T1) and open it at 115200 baud using the screen command:
```shell theme={null}
screen /dev/cu.usbserial-NNPMP271002T1 115200
```
4. Press **Enter** to bring up the login prompt, then sign in:
* **Username:** `root`
* **Password:** `oelinux123`
## Verify the software version
Confirm the device is running Qualcomm Linux:
```shell theme={null}
cat /etc/os-release
```
**Expected output:**
```text theme={null}
ID=qcom-distro-sota
NAME="Qualcomm Linux Reference Distro(OTA-enabled)"
VERSION="2.0"
PRETTY_NAME="Qualcomm Linux Reference Distro (OTA-enabled) 2.0"
```
Check the kernel version:
```shell theme={null}
uname -a
```
**Expected output:**
```text theme={null}
Linux iq-8275-evk 6.18.30-... #1 SMP PREEMPT ... aarch64 GNU/Linux
```
If the version doesn't match, or you can't reach a login prompt at all, the image is missing or outdated. Go back to [**Update software**](./update-software/overview) and flash the latest Qualcomm Linux.
## Connect to the device
Choose one of the options below. All three require the UART console for the initial setup commands (see [Set up the debug UART](#set-up-the-debug-uart)). After the first setup, USB (ADB) gives you a direct USB shell; Wi-Fi and Ethernet let you connect over SSH.
ADB (Android Debug Bridge) gives you a USB shell into the device. Because `adbd` is disabled by default, you need to enable it once via UART before ADB will work.
**1. Install ADB on your Ubuntu host:**
```shell theme={null}
sudo apt install android-tools-adb android-tools-fastboot
```
Verify:
```shell theme={null}
adb --version
```
For Windows and Mac hosts install ADB from [**Android SDK platform tools**](https://developer.android.com/tools/releases/platform-tools#downloads)
**2. Enable adbd on the device** (one-time, from the UART console):
```shell theme={null}
touch /etc/usb-debugging-enabled
systemctl enable --now android-tools-adbd
```
**3. Connect and open a shell:**
Connect a USB Type-C cable from your host to the device.
```shell theme={null}
adb devices
adb shell
```
**Sample output:**
```text theme={null}
List of devices attached
68f592a device
```
**1. Connect to a Wi-Fi network** (from the UART console):
```shell theme={null}
nmcli dev wifi list
nmcli dev wifi connect password
```
**Example** — network `QualcommWiFi`, password `1234567890`:
```shell theme={null}
nmcli dev wifi connect QualcommWiFi password 1234567890
```
**Sample output:**
```text theme={null}
Device 'wlp1s0' successfully activated with 'd7b990bd-3b77-4b13-b239-b706553abaf8'.
```
**2. Get the device IP address:**
```shell theme={null}
ip addr show wlp1s0
```
**3. SSH from your host** (must be on the same network):
```shell theme={null}
ssh root@
```
Enter the password `oelinux123` when prompted.
Connect an Ethernet cable from the RJ45 port on the EVK to your network router. An Ethernet cable is not included in the kit.
**1. Get the device IP address** (from the UART console):
```shell theme={null}
ip addr show end0
```
The value of `inet` in the output is the device IP address.
**2. SSH from your host** (must be on the same network):
```shell theme={null}
ssh root@
```
**Example:**
```shell theme={null}
ssh root@192.168.0.222
```
Enter the password `oelinux123` when prompted.
## Connect a display
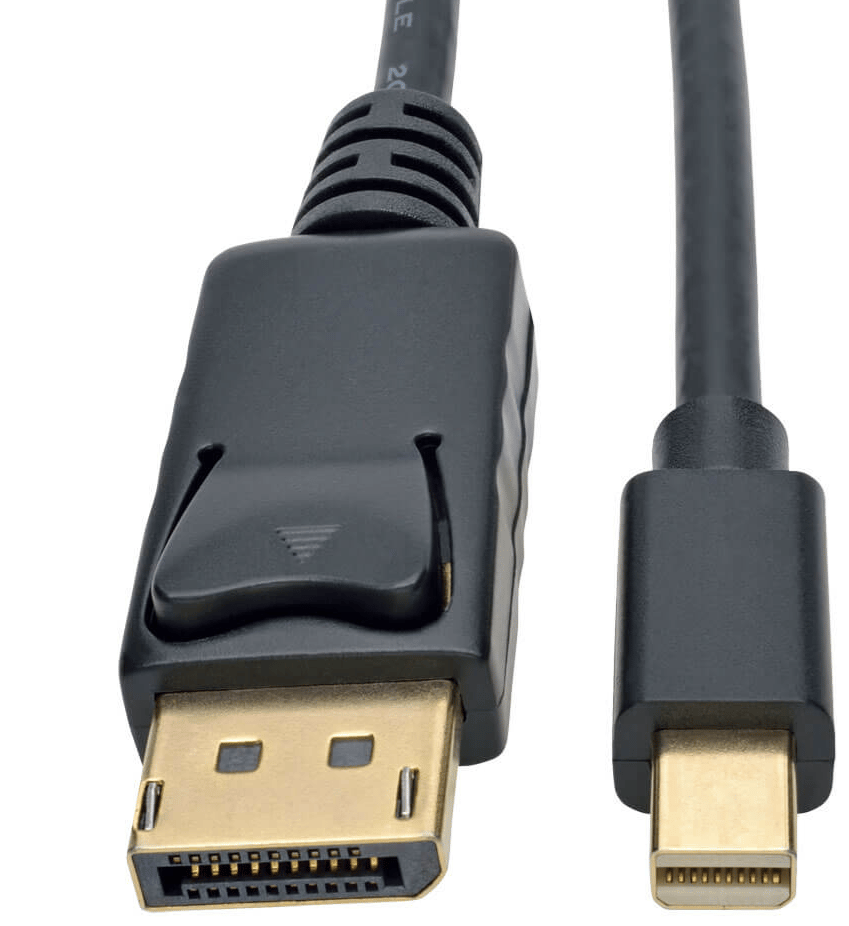
Connect a monitor to **DisplayPort0 (JEDP0)** or **JEDP1** on the EVK using an **active** Mini DisplayPort-to-DisplayPort cable (included in the box), or an **active** Mini DisplayPort-to-HDMI adapter (not included).
Display output works only through the DisplayPort connectors. There is no display output through the USB Type-C ports.
List the serial devices:
```shell theme={null}
ls /dev/cu.*
```
When the micro-USB cable is connected, four serial interfaces (T0-T3) become available through the onboard FT4232H quad-UART controller. The T1 interface, exposed as **/dev/cu.usbserial-device\_unique\_serial\_number-T1**, is used as the **primary serial debug console**. The remaining interfaces (T0, T2, and T3) are reserved for other communication and debugging use cases. Find your device node(T1) and open it at 115200 baud using the screen command:
```shell theme={null}
screen /dev/cu.usbserial-NNPMP271002T1 115200
```
4. Press **Enter** to bring up the login prompt, then sign in:
* **Username:** `root`
* **Password:** `oelinux123`
## Verify the software version
Confirm the device is running Qualcomm Linux:
```shell theme={null}
cat /etc/os-release
```
**Expected output:**
```text theme={null}
ID=qcom-distro-sota
NAME="Qualcomm Linux Reference Distro(OTA-enabled)"
VERSION="2.0"
PRETTY_NAME="Qualcomm Linux Reference Distro (OTA-enabled) 2.0"
```
Check the kernel version:
```shell theme={null}
uname -a
```
**Expected output:**
```text theme={null}
Linux iq-8275-evk 6.18.30-... #1 SMP PREEMPT ... aarch64 GNU/Linux
```
If the version doesn't match, or you can't reach a login prompt at all, the image is missing or outdated. Go back to [**Update software**](./update-software/overview) and flash the latest Qualcomm Linux.
## Connect to the device
Choose one of the options below. All three require the UART console for the initial setup commands (see [Set up the debug UART](#set-up-the-debug-uart)). After the first setup, USB (ADB) gives you a direct USB shell; Wi-Fi and Ethernet let you connect over SSH.
ADB (Android Debug Bridge) gives you a USB shell into the device. Because `adbd` is disabled by default, you need to enable it once via UART before ADB will work.
**1. Install ADB on your Ubuntu host:**
```shell theme={null}
sudo apt install android-tools-adb android-tools-fastboot
```
Verify:
```shell theme={null}
adb --version
```
For Windows and Mac hosts install ADB from [**Android SDK platform tools**](https://developer.android.com/tools/releases/platform-tools#downloads)
**2. Enable adbd on the device** (one-time, from the UART console):
```shell theme={null}
touch /etc/usb-debugging-enabled
systemctl enable --now android-tools-adbd
```
**3. Connect and open a shell:**
Connect a USB Type-C cable from your host to the device.
```shell theme={null}
adb devices
adb shell
```
**Sample output:**
```text theme={null}
List of devices attached
68f592a device
```
**1. Connect to a Wi-Fi network** (from the UART console):
```shell theme={null}
nmcli dev wifi list
nmcli dev wifi connect password
```
**Example** — network `QualcommWiFi`, password `1234567890`:
```shell theme={null}
nmcli dev wifi connect QualcommWiFi password 1234567890
```
**Sample output:**
```text theme={null}
Device 'wlp1s0' successfully activated with 'd7b990bd-3b77-4b13-b239-b706553abaf8'.
```
**2. Get the device IP address:**
```shell theme={null}
ip addr show wlp1s0
```
**3. SSH from your host** (must be on the same network):
```shell theme={null}
ssh root@
```
Enter the password `oelinux123` when prompted.
Connect an Ethernet cable from the RJ45 port on the EVK to your network router. An Ethernet cable is not included in the kit.
**1. Get the device IP address** (from the UART console):
```shell theme={null}
ip addr show end0
```
The value of `inet` in the output is the device IP address.
**2. SSH from your host** (must be on the same network):
```shell theme={null}
ssh root@
```
**Example:**
```shell theme={null}
ssh root@192.168.0.222
```
Enter the password `oelinux123` when prompted.
## Connect a display
Connect a monitor to **DisplayPort0 (JEDP0)** or **JEDP1** on the EVK using an **active** Mini DisplayPort-to-DisplayPort cable (included in the box), or an **active** Mini DisplayPort-to-HDMI adapter (not included).
Display output works only through the DisplayPort connectors. There is no display output through the USB Type-C ports.
 Power on the device and verify the display shows the expected startup output.
## Connect Bluetooth peripherals
Use `bluetoothctl` to pair and connect a Bluetooth keyboard or mouse.
1. Open the Bluetooth manager:
```shell theme={null}
bluetoothctl
```
2. Power on and start scanning:
```shell theme={null}
power on
scan on
```
3. Wait for your device to appear and note its MAC address:
```text theme={null}
[NEW] Device F8:7D:76:9D:9B:6B MyKeyboard
```
4. Pair, trust, and connect:
```shell theme={null}
pair F8:7D:76:9D:9B:6B
trust F8:7D:76:9D:9B:6B
connect F8:7D:76:9D:9B:6B
```
5. Stop scanning and exit:
```shell theme={null}
scan off
exit
```
The device reconnects automatically on future boots. For full Wi-Fi and Bluetooth details, see [**Wi-Fi and Bluetooth**](./peripherals-interfaces/WiFi-BT).
## SBC (Single Board Computer) mode
To use the EVK as a standalone computer with a keyboard, mouse, and monitor:
Power on the device and verify the display shows the expected startup output.
## Connect Bluetooth peripherals
Use `bluetoothctl` to pair and connect a Bluetooth keyboard or mouse.
1. Open the Bluetooth manager:
```shell theme={null}
bluetoothctl
```
2. Power on and start scanning:
```shell theme={null}
power on
scan on
```
3. Wait for your device to appear and note its MAC address:
```text theme={null}
[NEW] Device F8:7D:76:9D:9B:6B MyKeyboard
```
4. Pair, trust, and connect:
```shell theme={null}
pair F8:7D:76:9D:9B:6B
trust F8:7D:76:9D:9B:6B
connect F8:7D:76:9D:9B:6B
```
5. Stop scanning and exit:
```shell theme={null}
scan off
exit
```
The device reconnects automatically on future boots. For full Wi-Fi and Bluetooth details, see [**Wi-Fi and Bluetooth**](./peripherals-interfaces/WiFi-BT).
## SBC (Single Board Computer) mode
To use the EVK as a standalone computer with a keyboard, mouse, and monitor:
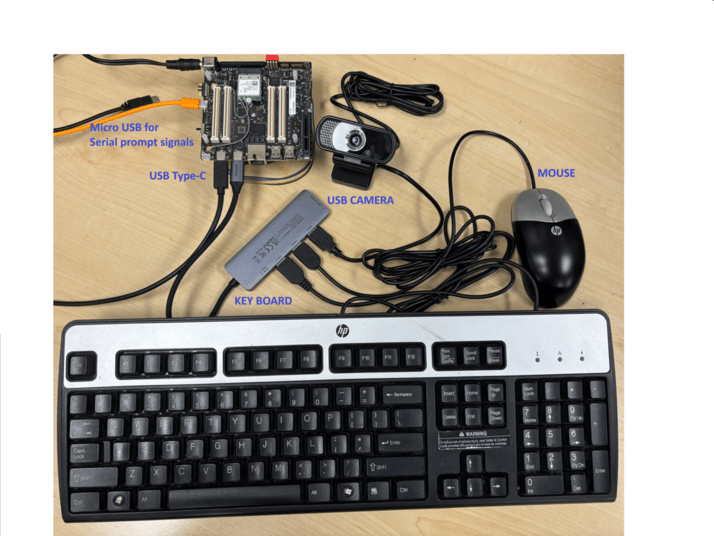 * **Power:** connect the 12 V adapter.
* **Serial console:** micro-USB to your host for UART logs (optional once set up).
* **USB hub:** connect a powered USB hub to a USB Type-C port for multiple peripherals.
* **Keyboard & mouse:** plug into the USB hub.
* **USB camera:** connect to the USB hub (must be UVC-compliant).
* **MIPI camera:** attach to a MIPI CSI connector on the board.
* **Display:** Mini DisplayPort to DisplayPort cable, or an active Mini DisplayPort-to-HDMI adapter.
## Next steps
* [Explore peripherals and interfaces](./peripherals-interfaces/peripheral_interface_overview)
* **Power:** connect the 12 V adapter.
* **Serial console:** micro-USB to your host for UART logs (optional once set up).
* **USB hub:** connect a powered USB hub to a USB Type-C port for multiple peripherals.
* **Keyboard & mouse:** plug into the USB hub.
* **USB camera:** connect to the USB hub (must be UVC-compliant).
* **MIPI camera:** attach to a MIPI CSI connector on the board.
* **Display:** Mini DisplayPort to DisplayPort cable, or an active Mini DisplayPort-to-HDMI adapter.
## Next steps
* [Explore peripherals and interfaces](./peripherals-interfaces/peripheral_interface_overview)