> ## Documentation Index
> Fetch the complete documentation index at: https://qualcomm-3.mintlify.site/llms.txt
> Use this file to discover all available pages before exploring further.
# Flash Qualcomm Linux using QDL
> Use the Qualcomm Device Loader (QDL) command-line tool to flash Qualcomm Linux onto the IQ-9075 EVK from Ubuntu, Windows, or macOS hosts.
**Qualcomm Device Loader (QDL)** is a cross-platform command-line flashing tool for Qualcomm devices. Use this method when you need full control over the flash process, are running in a headless environment, or want to script automated flashing.
For a GUI-based alternative, see [**Flash Qualcomm Linux using Qualcomm Launcher**](./flash-using-qualcomm-launcher).
Flashing erases all data on the device. Back up anything important before you begin.
## What you need
* IQ-9075 EVK with 12 V power supply
* USB Type-C cable (USB0 port on the EVK → host computer)
* Host computer running Ubuntu, Windows, or macOS
## Select your host OS and follow the complete path
Download QDL for your host OS from the [**Qualcomm Software Center**](https://softwarecenter.qualcomm.com/catalog/item/Qualcomm_Device_Loader).
### Download the Qualcomm Linux image
1. Download the [**Qualcomm Linux image**](https://artifacts.codelinaro.org/artifactory/qli-ci/flashable-binaries/meta-qcom/qcom-distro-sota/iq-9075-evk/qli-2.0-qcom-multimedia-proprietary-image.zip).
2. Extract the zip file
```text theme={null}
unzip qli-2.0-qcom-multimedia-proprietary-image.zip
```
The flashable artifacts are in:
```text theme={null}
/images/iq-9075-evk/qcom-multimedia-proprietary-image-iq-9075-evk/
```
Where `` is the folder created when you extracted the image zip.
### Download QDL
1. Download the [QDL tool for Linux (x64)](https://softwarecenter.qualcomm.com/catalog/item/Qualcomm_Device_Loader) and unzip it. The unzipped folder contains the `qdl` binary — referred to as `` below.
2. Install the required libraries (skip if already installed):
```shell theme={null}
sudo apt-get install libxml2-dev libudev-dev libusb-1.0-0-dev
```
We recommend extracting both the image and QDL into the same parent folder. This keeps all paths under one root and simplifies navigation between the provision, SAIL, and image folders.
### Set up QDL driver
Ubuntu requires a udev rule so the kernel grants your user permission to communicate with the device when it enters EDL mode.
1. Check whether the rule already exists:
```shell theme={null}
ls /etc/udev/rules.d/51-qcom-usb.rules
```
2. If the file is **not** present, create it in one command:
```shell theme={null}
echo 'SUBSYSTEMS=="usb", ATTRS{idVendor}=="05c6", ATTRS{idProduct}=="9008", MODE="0664", GROUP="plugdev"' | sudo tee /etc/udev/rules.d/51-qcom-usb.rules
```
If the file **already exists**, verify the rule is present:
```shell theme={null}
cat /etc/udev/rules.d/51-qcom-usb.rules
```
3. Reload udev to apply the rule:
```shell theme={null}
sudo systemctl restart udev
```
If the USB cable was already connected, disconnect and reconnect it.
### Set up QDL path
1. Make QDL executable:
```shell theme={null}
chmod +x /qdl
```
2. Verify QDL is working:
```shell theme={null}
/qdl --help
```
You should see the QDL usage output. If you get an error, check the path.
### Put the device in EDL mode
1. Put the device in EDL mode using the **SW2** DIP switches: set switches **1, 2, and 4** to **OFF** and switch **3** to **ON**.
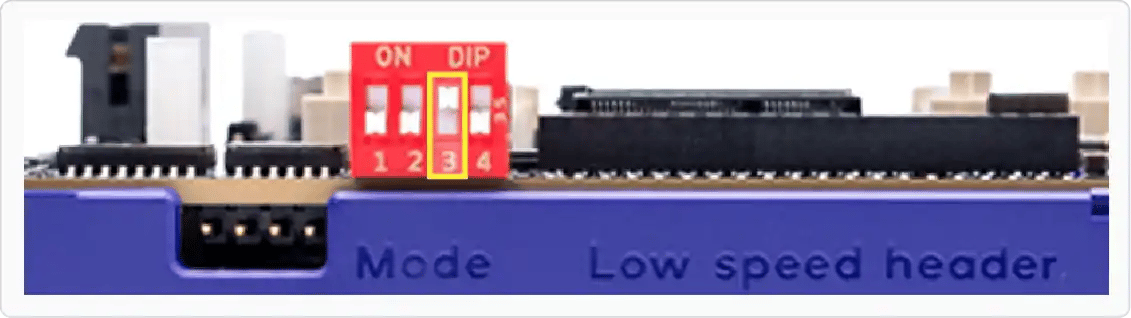 2. Connect the **12 V power supply** to the EVK.
3. Connect the **USB Type-C cable** from **USB0** on the EVK to your host.
2. Connect the **12 V power supply** to the EVK.
3. Connect the **USB Type-C cable** from **USB0** on the EVK to your host.
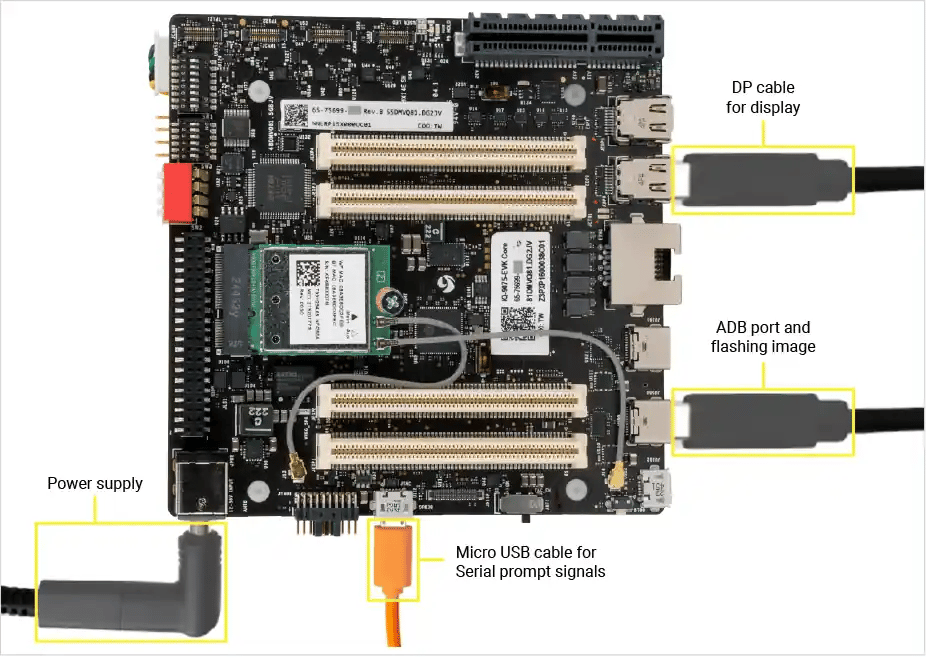 4. Toggle the **power switch** to turn on the device.
5. Confirm the device is in EDL mode:
```shell theme={null}
lsusb
```
**Expected output:**
```text theme={null}
Bus 002 Device 014: ID 05c6:9008 Qualcomm, Inc. Gobi Wireless Modem (QDL mode)
```
If the device doesn't appear, recheck SW2-3 and the USB-C cable.
### Provision UFS
UFS (Universal Flash Storage) provisioning divides the internal storage into separate logical unit numbers (LUNs), each dedicated to a specific type of data (boot, system, user data, etc.). This improves access efficiency and keeps the partition layout consistent across flashes.
Run UFS provisioning if any of the following apply:
* This is a **brand-new board** that has never been flashed.
* You are **upgrading to a new image version**.
* You are **switching distributions** (Qualcomm Linux ↔ Ubuntu).
1. Download and unzip the provision file:
```shell theme={null}
wget https://artifacts.codelinaro.org/artifactory/codelinaro-le/Qualcomm_Linux/QCS9100/provision.zip
unzip provision.zip -d provision
```
2. Provision UFS from the unzipped provision directory:
```shell theme={null}
cd provision
/qdl --storage ufs prog_firehose_ddr.elf provision_1_2.xml
```
**Expected output:**
```text theme={null}
UFS provisioning succeeded
```
After UFS provisioning completes, the device disconnects from USB. Toggle the power switch off and on to reboot it back into EDL mode before continuing.
### Flash SAIL firmware
The Safety Island (SAIL) is a separate, isolated processor on the IQ-9075 EVK that handles safety-critical functions independently from the main application processor. Its firmware lives on a dedicated **spinor** flash partition and must be flashed separately before the main OS image.
1. Navigate to the `sail_nor` subfolder inside the extracted image:
```shell theme={null}
cd /images/iq-9075-evk/qcom-multimedia-proprietary-image-iq-9075-evk/sail_nor
```
2. Flash the SAIL firmware:
```shell theme={null}
/qdl --storage spinor prog_firehose_ddr.elf rawprogram0.xml patch0.xml
```
**Expected output:**
```text theme={null}
flashed "SAIL_HYP" successfully
flashed "SAIL_SW1" successfully
flashed "SAIL_HYP_BKUP" successfully
flashed "SAIL_SW1_BKUP" successfully
flashed "PrimaryGPT" successfully
flashed "BackupGPT" successfully
11 patches applied
```
### Flash Qualcomm Linux
1. Navigate to the main image folder:
```shell theme={null}
cd /images/iq-9075-evk/qcom-multimedia-proprietary-image-iq-9075-evk
```
2. Flash the image:
```shell theme={null}
/qdl --storage ufs prog_firehose_ddr.elf rawprogram*.xml patch*.xml
```
The flash is complete when the final line reads:
```text theme={null}
partition 1 is now bootable
```
Any sector-truncation warnings during flashing are harmless.
### Download the Qualcomm Linux image
1. Download the [**Qualcomm Linux image**](https://artifacts.codelinaro.org/artifactory/qli-ci/flashable-binaries/meta-qcom/qcom-distro-sota/iq-9075-evk/qli-2.0-qcom-multimedia-proprietary-image.zip)
2. Extract the zip file
```text theme={null}
tar -xf qli-2.0-qcom-multimedia-proprietary-image.zip
```
The flashable artifacts are in:
```text theme={null}
\images\iq-9075-evk\qcom-multimedia-proprietary-image-iq-9075-evk\
```
Where `` is the folder created when you extracted the image zip.
### Download QDL
1. Download the [QDL tool for Windows](https://softwarecenter.qualcomm.com/#/catalog/item/Qualcomm_Device_Loader) and extract it.
We recommend extracting both the image and QDL into the same parent folder (for example `C:\Users\you\Downloads\qualcomm-flash\`). This keeps all paths under one root and simplifies navigation between the provision, SAIL, and image folders.
### Set up QDL driver
1. Uninstall any existing Qualcomm USB drivers (QUD) — they conflict with the QDL driver. Open **Device Manager**, find your device, and uninstall any existing drivers. The device should **not** appear under COM Ports.
2. Run `install_driver.bat` from the unzipped QDL folder to install the WinUSB driver.
4. Toggle the **power switch** to turn on the device.
5. Confirm the device is in EDL mode:
```shell theme={null}
lsusb
```
**Expected output:**
```text theme={null}
Bus 002 Device 014: ID 05c6:9008 Qualcomm, Inc. Gobi Wireless Modem (QDL mode)
```
If the device doesn't appear, recheck SW2-3 and the USB-C cable.
### Provision UFS
UFS (Universal Flash Storage) provisioning divides the internal storage into separate logical unit numbers (LUNs), each dedicated to a specific type of data (boot, system, user data, etc.). This improves access efficiency and keeps the partition layout consistent across flashes.
Run UFS provisioning if any of the following apply:
* This is a **brand-new board** that has never been flashed.
* You are **upgrading to a new image version**.
* You are **switching distributions** (Qualcomm Linux ↔ Ubuntu).
1. Download and unzip the provision file:
```shell theme={null}
wget https://artifacts.codelinaro.org/artifactory/codelinaro-le/Qualcomm_Linux/QCS9100/provision.zip
unzip provision.zip -d provision
```
2. Provision UFS from the unzipped provision directory:
```shell theme={null}
cd provision
/qdl --storage ufs prog_firehose_ddr.elf provision_1_2.xml
```
**Expected output:**
```text theme={null}
UFS provisioning succeeded
```
After UFS provisioning completes, the device disconnects from USB. Toggle the power switch off and on to reboot it back into EDL mode before continuing.
### Flash SAIL firmware
The Safety Island (SAIL) is a separate, isolated processor on the IQ-9075 EVK that handles safety-critical functions independently from the main application processor. Its firmware lives on a dedicated **spinor** flash partition and must be flashed separately before the main OS image.
1. Navigate to the `sail_nor` subfolder inside the extracted image:
```shell theme={null}
cd /images/iq-9075-evk/qcom-multimedia-proprietary-image-iq-9075-evk/sail_nor
```
2. Flash the SAIL firmware:
```shell theme={null}
/qdl --storage spinor prog_firehose_ddr.elf rawprogram0.xml patch0.xml
```
**Expected output:**
```text theme={null}
flashed "SAIL_HYP" successfully
flashed "SAIL_SW1" successfully
flashed "SAIL_HYP_BKUP" successfully
flashed "SAIL_SW1_BKUP" successfully
flashed "PrimaryGPT" successfully
flashed "BackupGPT" successfully
11 patches applied
```
### Flash Qualcomm Linux
1. Navigate to the main image folder:
```shell theme={null}
cd /images/iq-9075-evk/qcom-multimedia-proprietary-image-iq-9075-evk
```
2. Flash the image:
```shell theme={null}
/qdl --storage ufs prog_firehose_ddr.elf rawprogram*.xml patch*.xml
```
The flash is complete when the final line reads:
```text theme={null}
partition 1 is now bootable
```
Any sector-truncation warnings during flashing are harmless.
### Download the Qualcomm Linux image
1. Download the [**Qualcomm Linux image**](https://artifacts.codelinaro.org/artifactory/qli-ci/flashable-binaries/meta-qcom/qcom-distro-sota/iq-9075-evk/qli-2.0-qcom-multimedia-proprietary-image.zip)
2. Extract the zip file
```text theme={null}
tar -xf qli-2.0-qcom-multimedia-proprietary-image.zip
```
The flashable artifacts are in:
```text theme={null}
\images\iq-9075-evk\qcom-multimedia-proprietary-image-iq-9075-evk\
```
Where `` is the folder created when you extracted the image zip.
### Download QDL
1. Download the [QDL tool for Windows](https://softwarecenter.qualcomm.com/#/catalog/item/Qualcomm_Device_Loader) and extract it.
We recommend extracting both the image and QDL into the same parent folder (for example `C:\Users\you\Downloads\qualcomm-flash\`). This keeps all paths under one root and simplifies navigation between the provision, SAIL, and image folders.
### Set up QDL driver
1. Uninstall any existing Qualcomm USB drivers (QUD) — they conflict with the QDL driver. Open **Device Manager**, find your device, and uninstall any existing drivers. The device should **not** appear under COM Ports.
2. Run `install_driver.bat` from the unzipped QDL folder to install the WinUSB driver.
 ### Put the device in EDL mode
1. Put the device in EDL mode using the **SW2** DIP switches: set switches **1, 2, and 4** to **OFF** and switch **3** to **ON**.
2. Connect the **12 V power supply** to the EVK.
3. Connect the **USB Type-C cable** from **USB0** on the EVK to your host.
4. Toggle the **power switch** to turn on the device.
5. Open **Device Manager** and confirm a Qualcomm USB device appears (not under COM Ports).
### Put the device in EDL mode
1. Put the device in EDL mode using the **SW2** DIP switches: set switches **1, 2, and 4** to **OFF** and switch **3** to **ON**.
2. Connect the **12 V power supply** to the EVK.
3. Connect the **USB Type-C cable** from **USB0** on the EVK to your host.
4. Toggle the **power switch** to turn on the device.
5. Open **Device Manager** and confirm a Qualcomm USB device appears (not under COM Ports).
 ### Provision UFS
UFS (Universal Flash Storage) provisioning divides the internal storage into separate logical unit numbers (LUNs), each dedicated to a specific type of data (boot, system, user data, etc.). This improves access efficiency and keeps the partition layout consistent across flashes.
Run UFS provisioning if any of the following apply:
* This is a **brand-new board** that has never been flashed.
* You are **upgrading to a new image version**.
* You are **switching distributions** (Qualcomm Linux ↔ Ubuntu).
1. Download [**provision.zip**](https://artifacts.codelinaro.org/artifactory/codelinaro-le/Qualcomm_Linux/QCS9100/provision.zip) and extract it.
2. Navigate to the extracted provision folder:
```shell theme={null}
cd
```
3. Provision UFS (replace `` with your QDL folder path):
**Command Prompt:**
```shell theme={null}
"\qdl.exe" --storage ufs prog_firehose_ddr.elf provision_1_2.xml
```
**PowerShell:**
```shell theme={null}
& "\qdl.exe" --storage ufs prog_firehose_ddr.elf provision_1_2.xml
```
**Expected output:**
```text theme={null}
UFS provisioning succeeded
```
After UFS provisioning completes, the device disconnects from USB. Toggle the power switch off and on to reboot it back into EDL mode before continuing.
### Flash SAIL firmware
The Safety Island (SAIL) is a separate, isolated processor on the IQ-9075 EVK that handles safety-critical functions independently from the main application processor. Its firmware lives on a dedicated **spinor** flash partition and must be flashed separately before the main OS image.
1. Navigate to the `sail_nor` subfolder inside the image directory:
```shell theme={null}
cd \images\iq-9075-evk\qcom-multimedia-proprietary-image-iq-9075-evk\sail_nor
```
2. Flash the SAIL firmware (replace `` with your QDL folder path):
**Command Prompt:**
```shell theme={null}
"\qdl.exe" --storage spinor prog_firehose_ddr.elf rawprogram0.xml patch0.xml
```
**PowerShell:**
```shell theme={null}
& "\qdl.exe" --storage spinor prog_firehose_ddr.elf rawprogram0.xml patch0.xml
```
**Expected output:**
```text theme={null}
flashed "SAIL_HYP" successfully
flashed "SAIL_SW1" successfully
flashed "SAIL_HYP_BKUP" successfully
flashed "SAIL_SW1_BKUP" successfully
flashed "PrimaryGPT" successfully
flashed "BackupGPT" successfully
11 patches applied
```
### Flash Qualcomm Linux
1. Navigate to the main image folder:
```shell theme={null}
cd \images\iq-9075-evk\qcom-multimedia-proprietary-image-iq-9075-evk
```
2. Flash the image (replace `` with your QDL folder path — Windows does not support wildcards, list all files explicitly):
**Command Prompt:**
```shell theme={null}
"\qdl.exe" prog_firehose_ddr.elf rawprogram0.xml rawprogram1.xml rawprogram2.xml rawprogram3.xml rawprogram4.xml rawprogram5.xml patch0.xml patch1.xml patch2.xml patch3.xml patch4.xml patch5.xml
```
**PowerShell:**
```shell theme={null}
& "\qdl.exe" prog_firehose_ddr.elf rawprogram0.xml rawprogram1.xml rawprogram2.xml rawprogram3.xml rawprogram4.xml rawprogram5.xml patch0.xml patch1.xml patch2.xml patch3.xml patch4.xml patch5.xml
```
The flash is complete when the final line reads:
```text theme={null}
partition 1 is now bootable
```
### Download the Qualcomm Linux image
1. Download the [**Qualcomm Linux image**](https://artifacts.codelinaro.org/artifactory/qli-ci/flashable-binaries/meta-qcom/qcom-distro-sota/iq-9075-evk/qli-2.0-qcom-multimedia-proprietary-image.zip).
2. Extract the zip file
```text theme={null}
unzip qli-2.0-qcom-multimedia-proprietary-image.zip
```
The flashable artifacts are in:
```text theme={null}
/images/iq-9075-evk/qcom-multimedia-proprietary-image-iq-9075-evk/
```
Where `` is the folder created when you extracted the image zip.
### Download QDL
1. Download the [QDL tool for macOS (Apple Silicon)](https://softwarecenter.qualcomm.com/catalog/item/Qualcomm_Device_Loader) and unzip it. The unzipped folder contains the `qdl` binary — referred to as `` below. For tool usage details, see the **QDL\_User\_Guide** in that folder.
We recommend extracting both the image and QDL into the same parent folder. This keeps all paths under one root and simplifies navigation between the provision, SAIL, and image folders.
### Set up QDL path
1. Install required libraries via Homebrew (skip if already installed):
```shell theme={null}
brew install libusb libxml2
```
Brew (officially called Homebrew) is software package manager that lets you install, update, and remove programs using text commands in the Mac Terminal. Follow the below procedure to install homebrew.
**1. Install xcode**
```shell theme={null}
xcode-select --install
```
**2. Run the homebrew installation command**
```shell theme={null}
/bin/bash -c "$(curl -fsSL https://raw.githubusercontent.com/Homebrew/install/HEAD/install.sh)"
```
**3. Add Homebrew to your shell’s PATH**
```shell theme={null}
vi ~/.zshrc or vi ~/.bash_profile
```
Add the below line
```shell theme={null}
PATH=/opt/homebrew/bin:$PATH
```
**4. Apply the changes**
```shell theme={null}
source ~/.zshrc or source ~/.bash_profile
```
**5. Verify installation**
```shell theme={null}
brew doctor
```
**Expected output:**
```text theme={null}
Your system is ready to brew
```
2. Make QDL executable and clear the macOS quarantine flag so Gatekeeper allows it to run:
```shell theme={null}
chmod +x /qdl
sudo xattr -dr com.apple.quarantine
```
`sudo` is needed because some bundled libraries are read-only. If macOS still blocks the tool after this step, allow it under **System Settings → Privacy & Security**.
3. Verify QDL is working:
```shell theme={null}
/qdl --help
```
You should see the QDL usage output. If you get an error, check the path.
### Put the device in EDL mode
1. Put the device in EDL mode using the **SW2** DIP switches: set switches **1, 2, and 4** to **OFF** and switch **3** to **ON**.
2. Connect the **12 V power supply** to the EVK.
3. Connect the **USB Type-C cable** from **USB0** on the EVK to your host.
4. Toggle the **power switch** to turn on the device.
5. Confirm the device is in EDL mode:
```shell theme={null}
system_profiler SPUSBDataType | grep -A4 -i qualcomm
```
**Expected output:**
```text theme={null}
Product ID: 0x9008
Vendor ID: 0x05c6 (Qualcomm, Inc)
Manufacturer: Qualcomm CDMA Technologies MSM
```
`Product ID: 0x9008` confirms the device is in EDL mode. If it doesn't appear, recheck SW2-3 and the USB-C cable.
### Provision UFS
UFS (Universal Flash Storage) provisioning divides the internal storage into separate logical unit numbers (LUNs), each dedicated to a specific type of data (boot, system, user data, etc.). This improves access efficiency and keeps the partition layout consistent across flashes.
Run UFS provisioning if any of the following apply:
* This is a **brand-new board** that has never been flashed.
* You are **upgrading to a new image version**.
* You are **switching distributions** (Qualcomm Linux ↔ Ubuntu).
1. Download [**provision.zip**](https://artifacts.codelinaro.org/artifactory/codelinaro-le/Qualcomm_Linux/QCS9100/provision.zip) and unzip it:
```shell theme={null}
unzip provision.zip
```
2. Move the provision files and the QDL binary into the same folder, then run from there:
On macOS, the `qdl` binary and its supporting libraries must be in the same directory as the provision files. Copy the provision files into ``, then run the command from there.
```shell theme={null}
./qdl --storage ufs prog_firehose_ddr.elf provision_1_2.xml
```
**Expected output:**
```text theme={null}
UFS provisioning succeeded
```
After UFS provisioning completes, the device disconnects from USB. Toggle the power switch off and on to reboot it back into EDL mode before continuing.
### Flash SAIL firmware
The Safety Island (SAIL) is a separate, isolated processor on the IQ-9075 EVK that handles safety-critical functions independently from the main application processor. Its firmware lives on a dedicated **spinor** flash partition and must be flashed separately before the main OS image.
1. Navigate to the `sail_nor` subfolder inside the extracted image:
```shell theme={null}
cd /images/iq-9075-evk/qcom-multimedia-proprietary-image-iq-9075-evk/sail_nor
```
2. Flash the SAIL firmware:
```shell theme={null}
/qdl --storage spinor prog_firehose_ddr.elf rawprogram0.xml patch0.xml
```
**Expected output:**
```text theme={null}
flashed "SAIL_HYP" successfully
flashed "SAIL_SW1" successfully
flashed "SAIL_HYP_BKUP" successfully
flashed "SAIL_SW1_BKUP" successfully
flashed "PrimaryGPT" successfully
flashed "BackupGPT" successfully
11 patches applied
```
### Flash Qualcomm Linux
1. Navigate to the main image folder:
```shell theme={null}
cd /images/iq-9075-evk/qcom-multimedia-proprietary-image-iq-9075-evk
```
2. Flash the image:
```shell theme={null}
/qdl --storage ufs prog_firehose_ddr.elf rawprogram*.xml patch*.xml
```
The flash is complete when the final line reads:
```text theme={null}
partition 1 is now bootable
```
Any sector-truncation warnings during flashing are harmless.
If flashing fails at any point, disconnect the USB cable and power supply, reconnect them, and retry from the EDL mode step.
## Finish
1. **Turn off** the SW2-3 DIP switch — push it down.
2. Power-cycle the device. It boots into the newly flashed Qualcomm Linux image.
## Next steps
Continue to [**Set up the device**](../set-up-the-device) to connect the debug UART, verify the software version, and bring up the network, SSH, and display.
### Provision UFS
UFS (Universal Flash Storage) provisioning divides the internal storage into separate logical unit numbers (LUNs), each dedicated to a specific type of data (boot, system, user data, etc.). This improves access efficiency and keeps the partition layout consistent across flashes.
Run UFS provisioning if any of the following apply:
* This is a **brand-new board** that has never been flashed.
* You are **upgrading to a new image version**.
* You are **switching distributions** (Qualcomm Linux ↔ Ubuntu).
1. Download [**provision.zip**](https://artifacts.codelinaro.org/artifactory/codelinaro-le/Qualcomm_Linux/QCS9100/provision.zip) and extract it.
2. Navigate to the extracted provision folder:
```shell theme={null}
cd
```
3. Provision UFS (replace `` with your QDL folder path):
**Command Prompt:**
```shell theme={null}
"\qdl.exe" --storage ufs prog_firehose_ddr.elf provision_1_2.xml
```
**PowerShell:**
```shell theme={null}
& "\qdl.exe" --storage ufs prog_firehose_ddr.elf provision_1_2.xml
```
**Expected output:**
```text theme={null}
UFS provisioning succeeded
```
After UFS provisioning completes, the device disconnects from USB. Toggle the power switch off and on to reboot it back into EDL mode before continuing.
### Flash SAIL firmware
The Safety Island (SAIL) is a separate, isolated processor on the IQ-9075 EVK that handles safety-critical functions independently from the main application processor. Its firmware lives on a dedicated **spinor** flash partition and must be flashed separately before the main OS image.
1. Navigate to the `sail_nor` subfolder inside the image directory:
```shell theme={null}
cd \images\iq-9075-evk\qcom-multimedia-proprietary-image-iq-9075-evk\sail_nor
```
2. Flash the SAIL firmware (replace `` with your QDL folder path):
**Command Prompt:**
```shell theme={null}
"\qdl.exe" --storage spinor prog_firehose_ddr.elf rawprogram0.xml patch0.xml
```
**PowerShell:**
```shell theme={null}
& "\qdl.exe" --storage spinor prog_firehose_ddr.elf rawprogram0.xml patch0.xml
```
**Expected output:**
```text theme={null}
flashed "SAIL_HYP" successfully
flashed "SAIL_SW1" successfully
flashed "SAIL_HYP_BKUP" successfully
flashed "SAIL_SW1_BKUP" successfully
flashed "PrimaryGPT" successfully
flashed "BackupGPT" successfully
11 patches applied
```
### Flash Qualcomm Linux
1. Navigate to the main image folder:
```shell theme={null}
cd \images\iq-9075-evk\qcom-multimedia-proprietary-image-iq-9075-evk
```
2. Flash the image (replace `` with your QDL folder path — Windows does not support wildcards, list all files explicitly):
**Command Prompt:**
```shell theme={null}
"\qdl.exe" prog_firehose_ddr.elf rawprogram0.xml rawprogram1.xml rawprogram2.xml rawprogram3.xml rawprogram4.xml rawprogram5.xml patch0.xml patch1.xml patch2.xml patch3.xml patch4.xml patch5.xml
```
**PowerShell:**
```shell theme={null}
& "\qdl.exe" prog_firehose_ddr.elf rawprogram0.xml rawprogram1.xml rawprogram2.xml rawprogram3.xml rawprogram4.xml rawprogram5.xml patch0.xml patch1.xml patch2.xml patch3.xml patch4.xml patch5.xml
```
The flash is complete when the final line reads:
```text theme={null}
partition 1 is now bootable
```
### Download the Qualcomm Linux image
1. Download the [**Qualcomm Linux image**](https://artifacts.codelinaro.org/artifactory/qli-ci/flashable-binaries/meta-qcom/qcom-distro-sota/iq-9075-evk/qli-2.0-qcom-multimedia-proprietary-image.zip).
2. Extract the zip file
```text theme={null}
unzip qli-2.0-qcom-multimedia-proprietary-image.zip
```
The flashable artifacts are in:
```text theme={null}
/images/iq-9075-evk/qcom-multimedia-proprietary-image-iq-9075-evk/
```
Where `` is the folder created when you extracted the image zip.
### Download QDL
1. Download the [QDL tool for macOS (Apple Silicon)](https://softwarecenter.qualcomm.com/catalog/item/Qualcomm_Device_Loader) and unzip it. The unzipped folder contains the `qdl` binary — referred to as `` below. For tool usage details, see the **QDL\_User\_Guide** in that folder.
We recommend extracting both the image and QDL into the same parent folder. This keeps all paths under one root and simplifies navigation between the provision, SAIL, and image folders.
### Set up QDL path
1. Install required libraries via Homebrew (skip if already installed):
```shell theme={null}
brew install libusb libxml2
```
Brew (officially called Homebrew) is software package manager that lets you install, update, and remove programs using text commands in the Mac Terminal. Follow the below procedure to install homebrew.
**1. Install xcode**
```shell theme={null}
xcode-select --install
```
**2. Run the homebrew installation command**
```shell theme={null}
/bin/bash -c "$(curl -fsSL https://raw.githubusercontent.com/Homebrew/install/HEAD/install.sh)"
```
**3. Add Homebrew to your shell’s PATH**
```shell theme={null}
vi ~/.zshrc or vi ~/.bash_profile
```
Add the below line
```shell theme={null}
PATH=/opt/homebrew/bin:$PATH
```
**4. Apply the changes**
```shell theme={null}
source ~/.zshrc or source ~/.bash_profile
```
**5. Verify installation**
```shell theme={null}
brew doctor
```
**Expected output:**
```text theme={null}
Your system is ready to brew
```
2. Make QDL executable and clear the macOS quarantine flag so Gatekeeper allows it to run:
```shell theme={null}
chmod +x /qdl
sudo xattr -dr com.apple.quarantine
```
`sudo` is needed because some bundled libraries are read-only. If macOS still blocks the tool after this step, allow it under **System Settings → Privacy & Security**.
3. Verify QDL is working:
```shell theme={null}
/qdl --help
```
You should see the QDL usage output. If you get an error, check the path.
### Put the device in EDL mode
1. Put the device in EDL mode using the **SW2** DIP switches: set switches **1, 2, and 4** to **OFF** and switch **3** to **ON**.
2. Connect the **12 V power supply** to the EVK.
3. Connect the **USB Type-C cable** from **USB0** on the EVK to your host.
4. Toggle the **power switch** to turn on the device.
5. Confirm the device is in EDL mode:
```shell theme={null}
system_profiler SPUSBDataType | grep -A4 -i qualcomm
```
**Expected output:**
```text theme={null}
Product ID: 0x9008
Vendor ID: 0x05c6 (Qualcomm, Inc)
Manufacturer: Qualcomm CDMA Technologies MSM
```
`Product ID: 0x9008` confirms the device is in EDL mode. If it doesn't appear, recheck SW2-3 and the USB-C cable.
### Provision UFS
UFS (Universal Flash Storage) provisioning divides the internal storage into separate logical unit numbers (LUNs), each dedicated to a specific type of data (boot, system, user data, etc.). This improves access efficiency and keeps the partition layout consistent across flashes.
Run UFS provisioning if any of the following apply:
* This is a **brand-new board** that has never been flashed.
* You are **upgrading to a new image version**.
* You are **switching distributions** (Qualcomm Linux ↔ Ubuntu).
1. Download [**provision.zip**](https://artifacts.codelinaro.org/artifactory/codelinaro-le/Qualcomm_Linux/QCS9100/provision.zip) and unzip it:
```shell theme={null}
unzip provision.zip
```
2. Move the provision files and the QDL binary into the same folder, then run from there:
On macOS, the `qdl` binary and its supporting libraries must be in the same directory as the provision files. Copy the provision files into ``, then run the command from there.
```shell theme={null}
./qdl --storage ufs prog_firehose_ddr.elf provision_1_2.xml
```
**Expected output:**
```text theme={null}
UFS provisioning succeeded
```
After UFS provisioning completes, the device disconnects from USB. Toggle the power switch off and on to reboot it back into EDL mode before continuing.
### Flash SAIL firmware
The Safety Island (SAIL) is a separate, isolated processor on the IQ-9075 EVK that handles safety-critical functions independently from the main application processor. Its firmware lives on a dedicated **spinor** flash partition and must be flashed separately before the main OS image.
1. Navigate to the `sail_nor` subfolder inside the extracted image:
```shell theme={null}
cd /images/iq-9075-evk/qcom-multimedia-proprietary-image-iq-9075-evk/sail_nor
```
2. Flash the SAIL firmware:
```shell theme={null}
/qdl --storage spinor prog_firehose_ddr.elf rawprogram0.xml patch0.xml
```
**Expected output:**
```text theme={null}
flashed "SAIL_HYP" successfully
flashed "SAIL_SW1" successfully
flashed "SAIL_HYP_BKUP" successfully
flashed "SAIL_SW1_BKUP" successfully
flashed "PrimaryGPT" successfully
flashed "BackupGPT" successfully
11 patches applied
```
### Flash Qualcomm Linux
1. Navigate to the main image folder:
```shell theme={null}
cd /images/iq-9075-evk/qcom-multimedia-proprietary-image-iq-9075-evk
```
2. Flash the image:
```shell theme={null}
/qdl --storage ufs prog_firehose_ddr.elf rawprogram*.xml patch*.xml
```
The flash is complete when the final line reads:
```text theme={null}
partition 1 is now bootable
```
Any sector-truncation warnings during flashing are harmless.
If flashing fails at any point, disconnect the USB cable and power supply, reconnect them, and retry from the EDL mode step.
## Finish
1. **Turn off** the SW2-3 DIP switch — push it down.
2. Power-cycle the device. It boots into the newly flashed Qualcomm Linux image.
## Next steps
Continue to [**Set up the device**](../set-up-the-device) to connect the debug UART, verify the software version, and bring up the network, SSH, and display.