

Introduction
Flash a prebuilt image onto a device. While Qualcomm hardware typically comes with a preloaded image, you can use this procedure to update to a newer software version or deploy images built from source. To flash a prebuilt image, the following steps are required:- Download the packages required for flashing the image – Download Required Packages
- Obtain flashable image – Obtain Flashable Image
- Identify storage configuration for your device – Identify Storage Configuration
- Update the udev rules on the host system – Configure udev rules
- Select the appropriate CDT based on the reference kit – Configure CDT
- Switch device to EDL mode – Switch device to EDL Mode
- Provision UFS – Provision UFS
- Flash SAIL – Flash SAIL
- Flash software image – Flash software image
Download required packages
QDL is a software utility used to communicate with Qualcomm USB devices in Emergency Download (EDL) mode, enabling you to upload a flash loader and program software images onto the device. Follow these steps to download and setup QDL on your system:- Navigate to QDL’s Releases Page and find the appropriate binary link based on your machine and architecture.
-
Download the QDL binary using the following command:
-
Unzip the downloaded archive:
-
Provide execute permission to the QDL binary:
-
Add the QDL executable to your system PATH:
-
Verify that the QDL executable is accessible:
Obtain flashable image
Before flashing, you need a flashable image directory on your host machine. Depending on how you obtained your image, choose one of the following paths.- Prebuilt Image
- Compiled Image
Prebuilt images are distributed as compressed archives. Download the archive for your
device from the Obtain Prebuilt Images
section, extract the archive, and go to the extracted directory.
-
Extract the archive:
-
Go to the extracted directory:
Identify storage configuration
Machine configurations come with either UFS or eMMC storage enabled by default, and these settings are reflected in the prebuilt images. If you need to modify the storage type, you must update the configuration and rebuild the image, as this cannot be changed in prebuilt binaries. The default storage configurations for supported platforms areConfigure udev rules
The host system must have the correctudev rules configured to allow proper USB
device access. This step is only required when setting up a new host environment or
when encountering permission issues while detecting the device over USB.
-
Run the following command to configure the
udevUSB rules for the Qualcomm manufacturing vendor ID 05c6 on the Linux host: -
Restart the
udevservice for the changes to take effect: - If the USB cable is already connected to the host, unplug and reconnect it for the updated rules to take effect.
Configure CDT
The configuration data table (CDT) contains device-specific information required for proper platform initialization. You need to select the correct CDT file based on your reference kit before flashing.- QCS6490/QCS5430
- IQ-X7181/IQ-X5121
- Other Kits
-
Multiple CDT binaries are provided as part of the qcomflash tarball.
Choose the correct CDT binary for your kit and replace the default
cdt.binwith the appropriate one. -
After the entire flashing process succeeds, you can verify that the correct CDT
is loaded by reviewing the UEFI serial logs. Use the Subtype field to identify
the CDT loaded onto your device.
Sample output
Switch device to EDL mode
The device must be in the EDL mode before you flash the software image. The Qualcomm supported device by default enters EDL mode if there is no image on the device after power up or if it’s corrupted. Follow these steps to force the device into EDL mode.- QCS6490/QCS5430
- IQ-9075
- IQ-8275
- IQ-615
- IQ-X7181/IQ-X5121
- Press and hold the F_DL button.
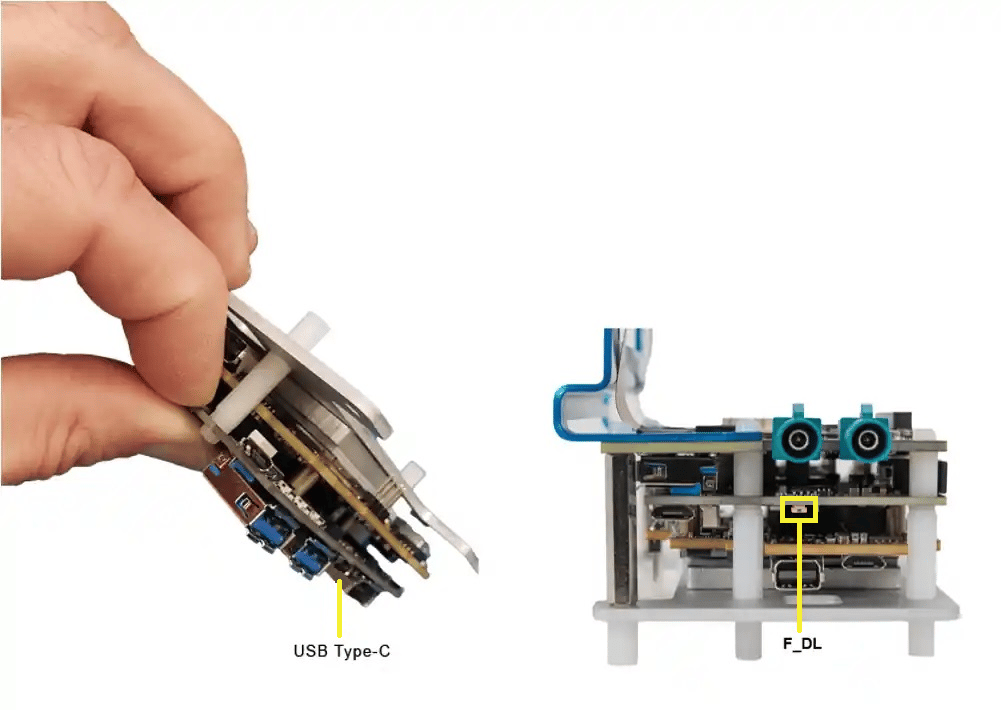
- Connect the device to a +12 V wall power supply.
- Connect the device to the host system through the USB Type-C connector.
- Release the F_DL button. The device is now in EDL mode.
- Unplug the power cable once the entire flashing process is complete to exit EDL mode.
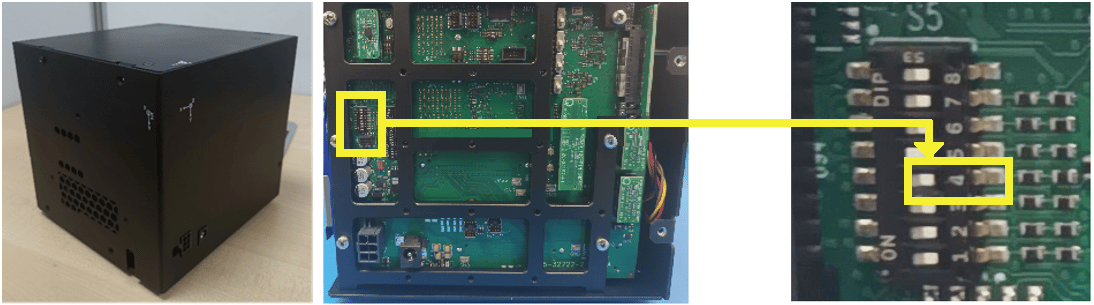
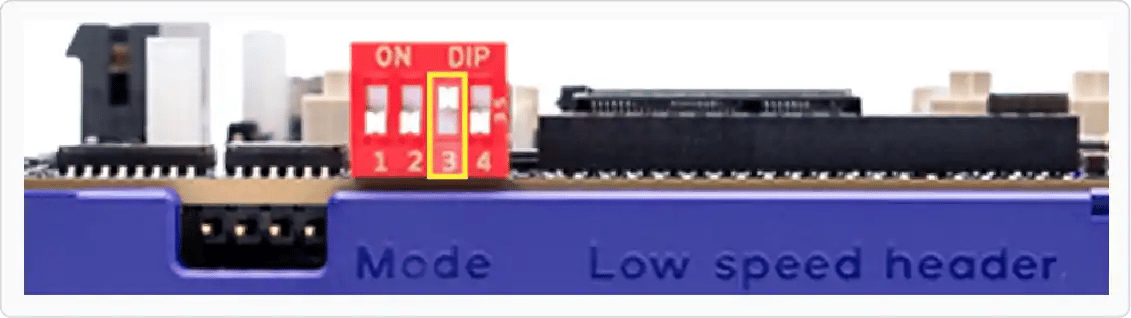
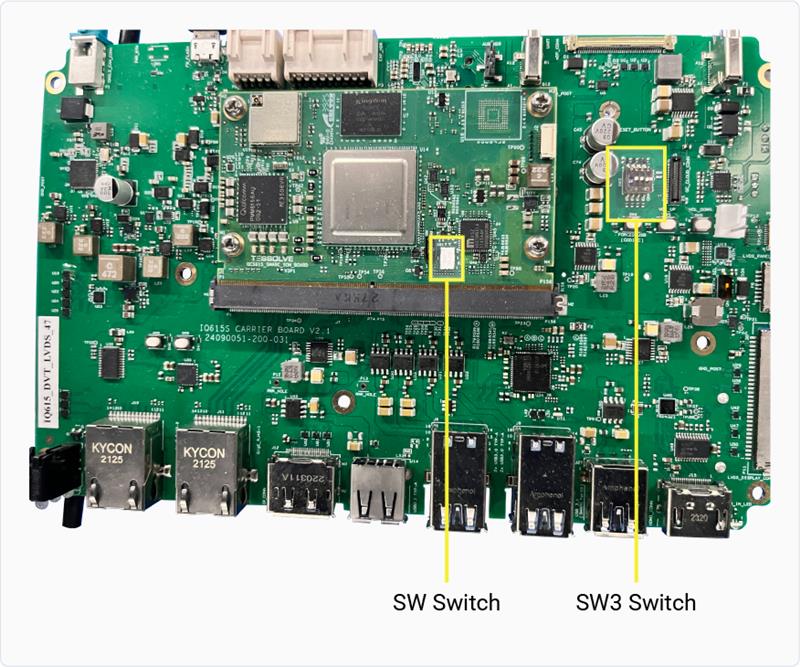
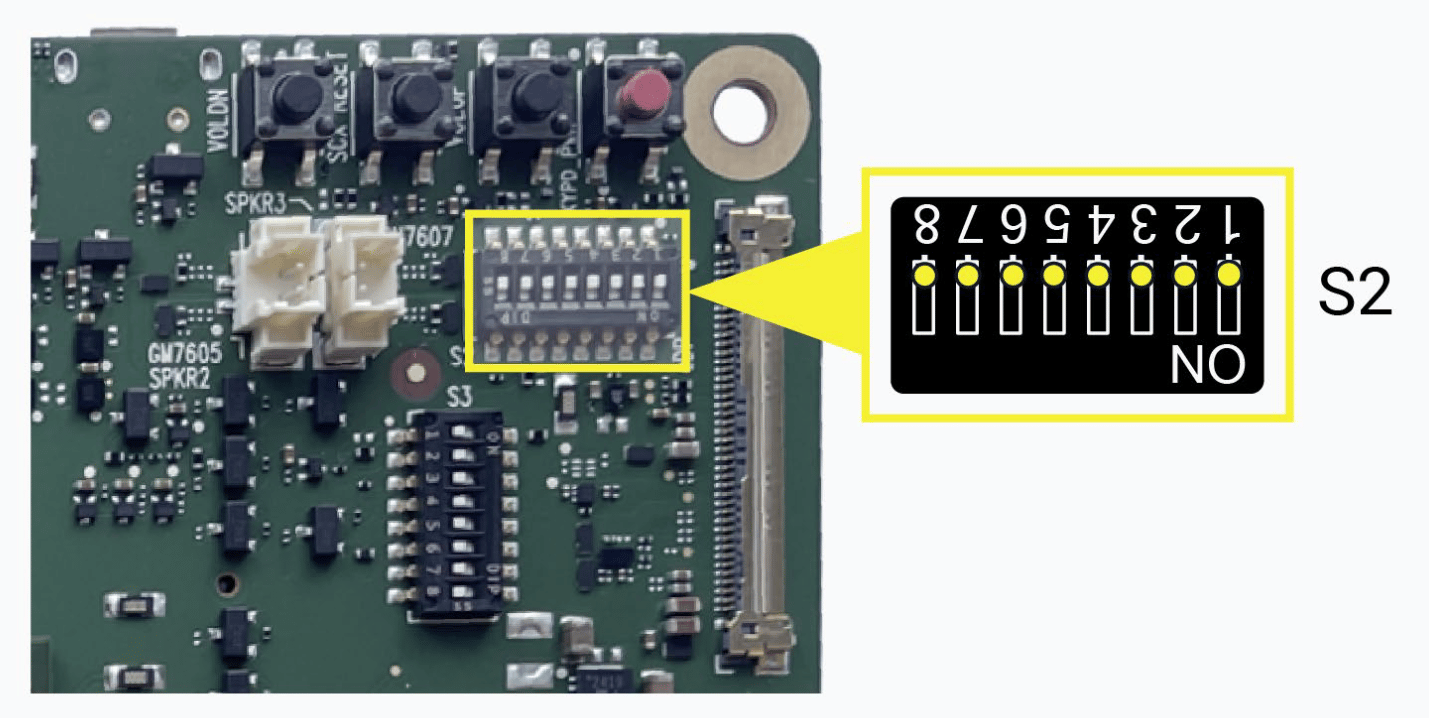
Expected output
Provision UFS
Universal flash storage (UFS) provisioning helps to divide the storage into many LUNs, which stores different types of data separately. This improves access efficiency and system organization. UFS is provisioned by default. If there are any changes in LUNs, UFS must be re-provisioned. To check if UFS needs to be re-provisioned, see the table UFS Provision in the Release Specific Information document.-
Download the provision file from Qualcomm’s artifacts server:
-
Unzip the downloaded archive:
-
Go to the extracted directory:
-
Provision UFS:
-
Navigate back to the previous directory:
Flash SAIL
Safety Island (SAIL) image contains the isolated, safety‑critical firmware that runs on the dedicated safety island to ensure secure boot and reliable system operation are independent of the main processor.Safety Island (SAIL) is applicable only for the Qualcomm Dragonwing™ IQ-9075
and the Qualcomm Dragonwing™ IQ-8275 development kits. If you’re not using one
of these development kits, skip this section.
-
The SAIL artifacts are present under the
sail_nordirectory within the unpacked qcomflash directory. Go to the following directory: -
Flash the SAIL:
-
Navigate back to the previous directory:
Flash software image
This section describes how to flash the image using QDL and verify a successful flashing process.-
Ensure the ModemManager service is not running, as it can interfere with QDL by
attempting to manage the device as a modem when connected over USB. Disable it
before connecting your device. On systemd-based systems, use the following command:
-
Flash the software image using QDL by selecting the appropriate storage option:
-
Flashing is successful if you see partition 1 is now bootable on the
terminal window as shown in the following message:
Sample output
-
If flashing fails, perform the following steps and retry the flashing procedure:
- Power off the device
- Disconnect from the host
- Restart the host
Related topics
- How to flash images using PCAT?
- How to switch to EDL mode using UART?
- How to switch to EDL mode using ADB?
- How to configure the storage type for a Yocto BSP build?
- How to connect to WiFi?
- How to sign in with SSH?
- How to configure Ethernet with RJ45 port?
- How to update USB and Ethernet Controller firmware?
- How to configure device drivers?